Jamf (macOS)

Jamf (macOS)

WAI Docs Wed Aug 19 13:22:37 EDT 2026
List
Quick Start
Welcome
Supported Applications & LLMs
Release Notes
August 18, 2026 WitnessAI Release
August 4, 2026 WitnessAI Release
July 21, 2026 WitnessAI Release
July 14, 2026 WitnessAI Release
July 9, 2026 WitnessAI Release
June 30, 2026 WitnessAI Hotfix
June 23, 2026 WitnessAI Release
June 16, 2026 WitnessAI Release
June 11, 2026 WitnessAI Release
June 4, 2026 WitnessAI Hotfix
June 2, 2026 WitnessAI Update
May 19, 2026 WitnessAI Update
April 30, 2026 WitnessAI Update
April 28, 2026 WitnessAI Update
April 23, 2026 WitnessAI Update
April 16, 2026 WitnessAI Update
April 14, 2026 WitnessAI Update
April 9, 2026 WitnessAI Update
April 7, 2026 WitnessAI Update
April 2, 2026 WitnessAI Update
March 31, 2026 WitnessAI Update
March 24, 2026 WitnessAI Update
March 19, 2026 WitnessAI Update
March 17, 2026 WitnessAI Update
March 12, 2026 WitnessAI Update
March 5, 2026 WitnessAI Update
February 26, 2026 WitnessAI Update
February 24, 2026 WitnessAI Update
February 10, 2026 WitnessAI Update
January 27, 2026 WitnessAI Update
January 20, 2026 WitnessAI Update
January 13, 2026 WitnessAI Update
December 18, 2025 WitnessAI Update
December 9, 2025 WitnessAI Update
November 25, 2025 WitnessAI Update
November 18, 2025 WitnessAI Update
November 11, 2025 WitnessAI Update
October 28, 2025 WitnessAI Update
October 23, 2025 WitnessAI Update
October 9, 2025 WitnessAI Update
October 2, 2025 WitnessAI Update
September 30, 2025: WitnessAI Update
September 23, 2025: WitnessAI Update
August 12, 2025: WitnessAI Update
July 31, 2025: WitnessAI Update
July 18, 2025: WitnessAI Update
April 11, 2025: WitnessAI Release v2.0
June 9, 2025: WitnessAI Update
June 23, 2025: WitnessAI Update
TOC Left Sidebar: not active
TOC Left Sidebar: ORIGINAL
User Guide
Policies - GuardRails
Witness Anywhere: Remote Device Security
Witness Attack
Administrator Guide
404
 

Deploying on macOS with Jamf

 
💡
Note: Witness Anywhere for macOS using Jamf cannot route traffic from Safari browser and Microsoft thick client apps (Ex: Word, Excel) to WitnessAI Proxy.
 
Flow diagram showing the macOS PAC Enrollment Flow: (1) Registration Script Run, (2) PAC URL sent back to Jamf, (3) MDM profile pushed, (4) Plist File Created, (5) Device added to Smart Group, (6) PAC Applied successfully. Shows the automated enrollment process for macOS devices using Jamf MDM.

Generate PAC Token & Download Files

  1. As a User with Admin Role or above, log into the WitnessAI Console.
  2. Click on the Settings menu item (1), then click on Proxy Configuration in the sub-menu (2).
  3. Enter a name in the Key Name field (3).
  4. Choose an Expiration Date (4).
  5. Click the Generate PAC Token button (5).
WitnessAI Settings > Proxy Configuration screen showing PAC token management. Annotated callouts: (1) Settings menu item, (2) Proxy Configuration sub-menu, (3) Key Name field with ‘macOS Jamf’ entered, (4) Expiration Date field, (5) Generate PAC Token button, (6) Action column with copy icon, (7) Build column with Jamf (Mac) download option highlighted.
  1. Locate the row in the list with the Key Name and Expiration Date of the PAC Token you created (6), and click the Download Symbol.
  2. Click on Jamf (Mac) (7) from the dropdown, and a zip file will be downloaded to your Downloads folder.
The downloaded file will have a name similar to: 1227db3823fcc1c7cd1db6cc3ed0c5cc1c7cd1da15c5b50a5b.zip.
It will uncompress to a folder of the same name, containing three files:
register_device.sh: A bash shell script to register the user device with Witness Anywhere.
pac_profile.mobileconfig: A configuration file to upload to Jamf to configure the proxy settings.
flush.sh: A bash shell script to deregister the user device and update Jamf.

Configure The Extension Attributes

  1. In the Jamf Portal, Navigate to Settings > Computer Management > Extension Attributes.
Jamf Pro Settings page showing the Computer management tab with Extension Attributes section visible. This is the navigation path for Settings > Computer Management > Extension Attributes to configure Witness PAC URL tracking.
 
  1. Click on New, input the values below, and click Save.
  2. Ensure the box labeled “Enable (script input type only)” is checked (1).
    Display Name: Witness_PAC_URL (2).
    Data Type: String (3).
    Inventory Display: Hardware (4).
    Input Type: Script (5).
    Script (6):
    #!/bin/bash pac_url=$(xmllint --xpath "string(//key[.='pac_url']/following-sibling::string[1])" /Library/Preferences/com.witnessai.settings.plist) echo "<result>$pac_url</result>"
    Jamf Pro Extension Attribute configuration form for ‘Witness_PAC_URL’. Annotated callouts: (1) Enable checkbox (script input type only) checked, (2) Display Name ‘Witness_PAC_URL’, (3) Data type ‘String’, (4) Inventory display ‘Hardware’, (5) Input type ‘Script’, (6) Script section with bash script to extract PAC URL from macOS plist.
     
  3. Click on the Witness_PAC_URL Extension Attribute entry and open it.
  4. Make a note of the ID number at the end of the URL in the Address Bar.
    In the below image the ID number is 1
    Example: https://{company-name}.jamfcloud.com/view/settings/computer-management/computer-extension-attributes/1
    Jamf Pro browser showing the Witness_PAC_URL Extension Attribute detail page. The URL in the address bar (witnessai.jamfcloud.com/view/settings/computer-management/computer-extension-attributes/1) is highlighted to show the ID number at the end (1 in this example).

Configure The Registration Script

  1. In the Jamf Portal, navigate to Settings > Computer management > Scripts and Click on New.
  2. Enter the details below and click save:
    • Display Name: Witness-PAC-Registration
    • Paste the downloaded register_device.sh script under the script tab.
  3. Configure the Computer Group
  4. In the Jamf Portal, navigate to Computers > Smart Computer Groups and click on New (1).
    Jamf Pro Smart Computer Groups list showing existing groups: All Managed Clients (7 count), All Managed Servers (0 count), non-wain-smart-group (4 count), PAC-Devices-Group (1 count). Callout (1) points to the ‘+ New’ button used to create a new Smart Computer Group for PAC devices.
  5. Enter a Display Name (Ex: Witness-PAC-Devices) (1).
  6. In the Criteria Tab (2), Click on Add
  7. Jamf Pro ‘New Smart Computer Group’ form showing Computer Group tab selected with Display Name field containing ‘Witness-PAC-Devices’ (callout 1) and Criteria tab (callout 2) visible. Used to create a smart group that will contain PAC-enrolled macOS devices.
     
  8. Choose Witness-PAC-URL (1) from the list.
  9. Jamf Pro ‘New Smart Computer Group’ Criteria tab showing the ADD NEW CRITERIA list including Application Title, Building, Computer Group, Computer Name, Department, Last Check-in, Last Inventory Update, Licensed Software, Model, Operating System, Packages Installed, Username, and ‘Witness_PAC_URL’ highlighted at the bottom (callout 1).
  10. Input the Values Below for Criteria Section and Save it.
  11. Operator (1): like.
    Value (2): https://api.{tenant-id}.{region}.witness.ai/v1/peas/pac
    Jamf Pro ‘Witness-PAC-Devices’ Smart Computer Group Criteria configuration showing: AND logic, Witness_PAC_URL attribute, Operator (1) set to ‘like’, Value (2) showing partial PAC URL ‘https://api.{tenant-id}.{region}.witness.ai/v1/peas/pac’. Used to automatically include devices with a PAC URL configured.

Configure The User Group

  1. Navigate to Users > Static User Groups and click on New
  2. Enter the Display Name of the group as Witness-PAC-Users
  3. Under the Assignments tab, filter and select all the required users.
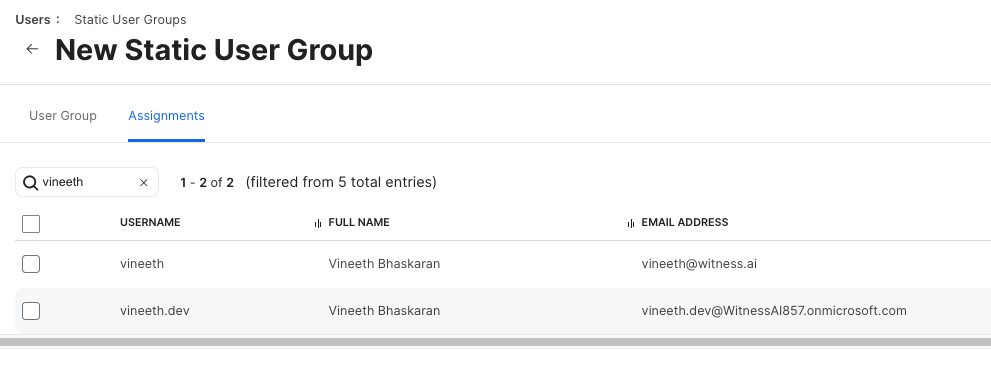
Jamf Pro ‘New Static User Group’ Assignments tab showing user search results for ‘vineeth’ with 2 of 2 results: ‘vineeth’ (Vineeth Bhaskaran, vineeth@witnessai) and ‘vineeth.dev’ (Vineeth Bhaskaran, vineeth.dev@WitnessAI807.onmicrosoft.com). Used to add users to the Witness-PAC-Users static user group.

Configure Policy to push the Registration Script

  1. In the Jamf Portal, Navigate to Computers > Policies and click on New
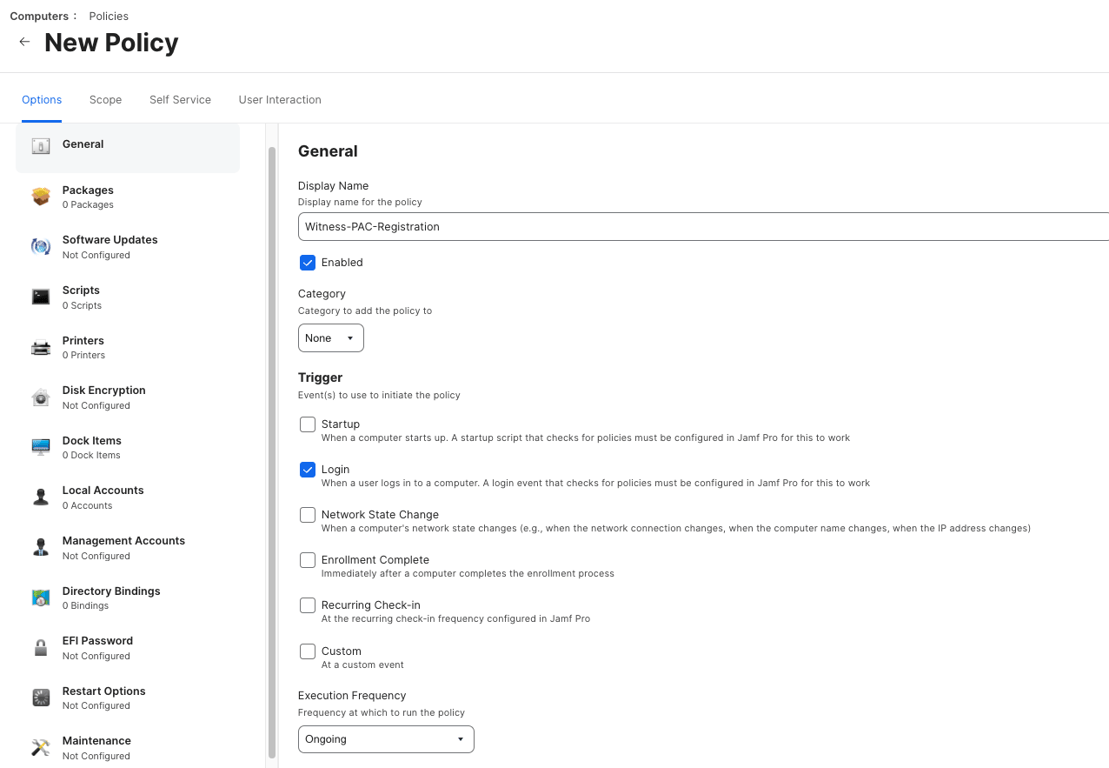
  2. In the General Section:
    • Enter the Display Name (1) as Witness-PAC-Registration.
    • Trigger: Check the Login checkbox (2).
  3. Login Event Configuration
    • Navigate to Settings > Computer management > Check-in
    • Click on Edit and Check the below items:
      1. Create login events
      2. Check for policies triggered by login
  • Execution Frequency: Ongoing
  • Jamf Pro ‘New Policy’ General section showing configuration: Display Name ‘Witness-PAC-Registration’, Enabled checkbox checked, Trigger section with ‘Login’ option checked, Execution Frequency set to ‘Ongoing’. Left sidebar shows policy sections: General, Packages, Software Updates, Scripts, Printers, Disk Encryption, Dock Items, Local Accounts, Management Accounts, Directory Bindings, FileVault, Restart Options, Maintenance.
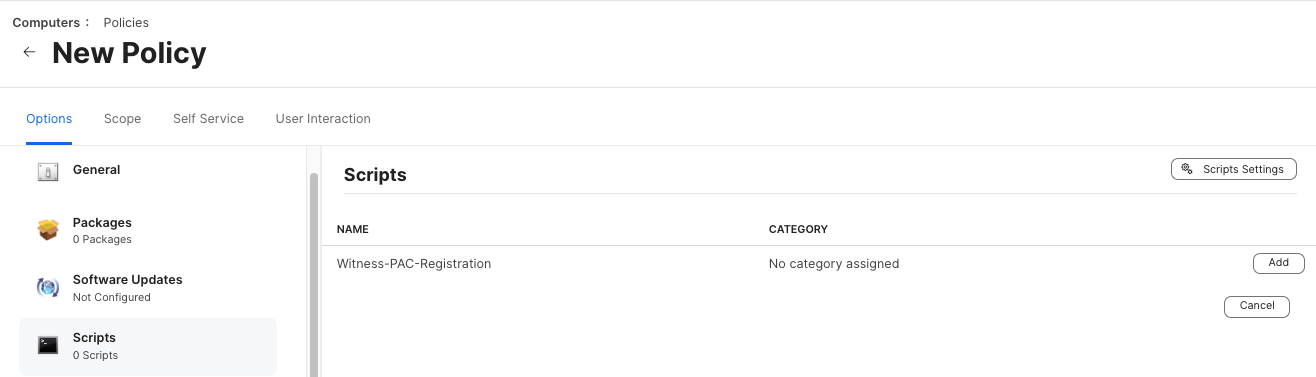
  • Click on Scripts Section Under Options and then Click on Configure.
  • Click on the Add button for Witness-PAC-Registration Script.
  • Jamf Pro ‘New Policy’ Scripts section showing ‘Witness-PAC-Registration’ script listed with ‘Not Assigned assigned’ status and an ‘Add’ button on the right. Used to add the registration script to the policy.
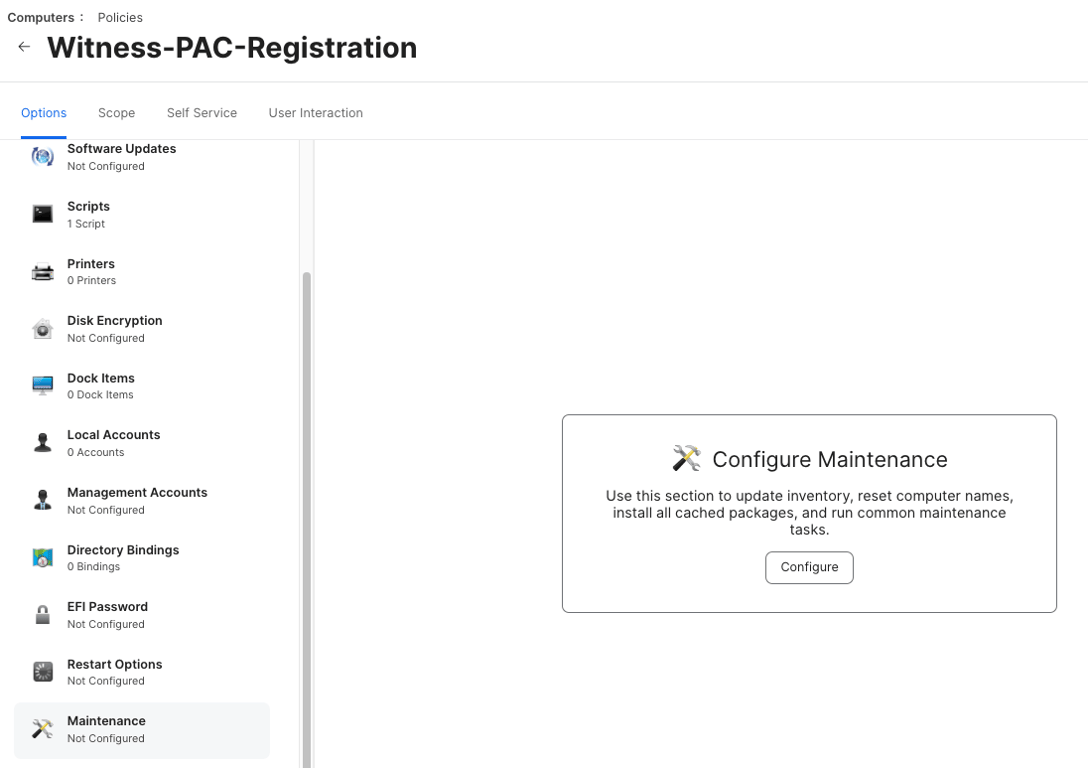
  • Now Click on Maintenance Under Option and Click Configure
Jamf Pro ‘Witness-PAC-Registration’ policy showing the Maintenance section with a ‘Configure Maintenance’ dialog that explains it can update inventory, reset computer names, install cached packages, and run common maintenance tasks. A ‘Configure’ button is available.
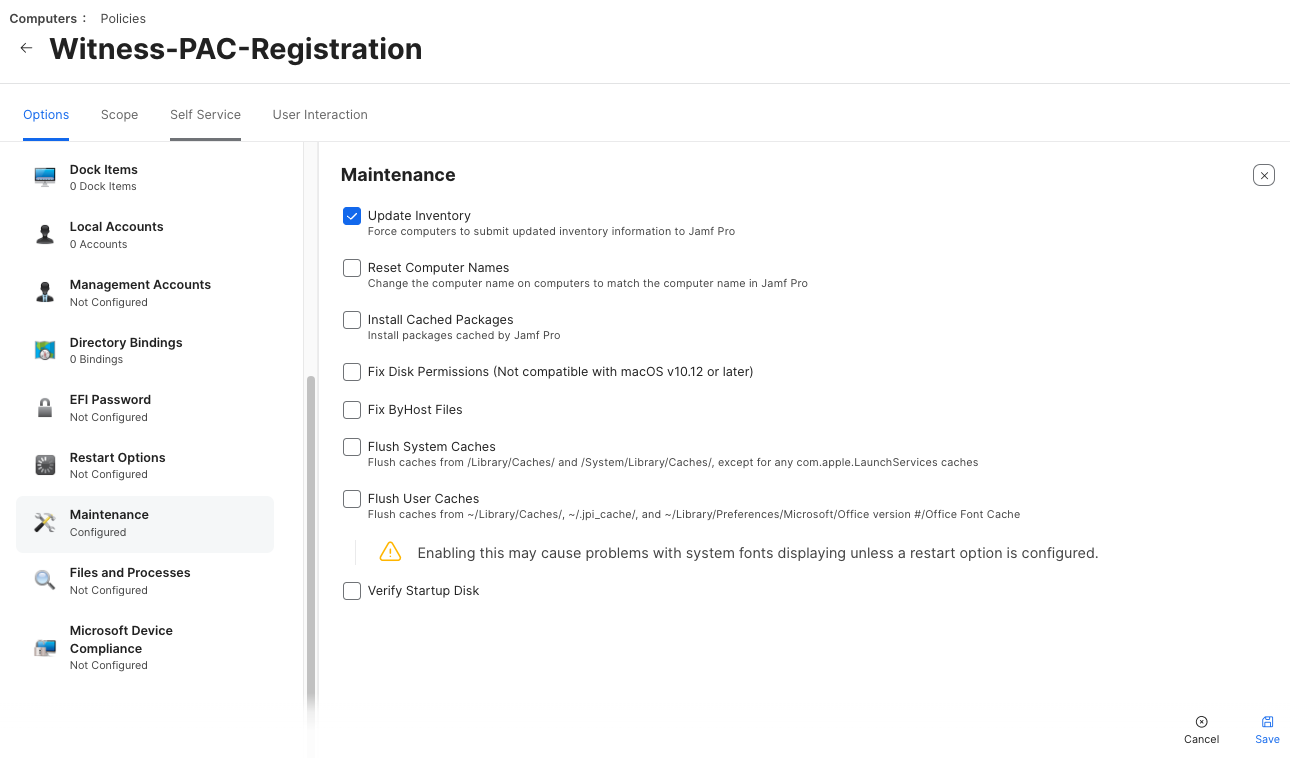
  • Make sure Update Inventory is selected.
  • Jamf Pro ‘Witness-PAC-Registration’ policy Maintenance section showing ‘Update Inventory’ checkbox checked at the top. Other unchecked options include Reset Computer Names, Install Cached Packages, Fix Dyld Permissions, Fix ByHost Files, Flush System Caches, Post System Caches, Fix ByHost Files, Post User Caches, Verify Startup Disk.
  • Now Click on the Scope Tab on the Top and click on Add
  • Select User Groups and Add the Witness-PAC-Users group and click Save.
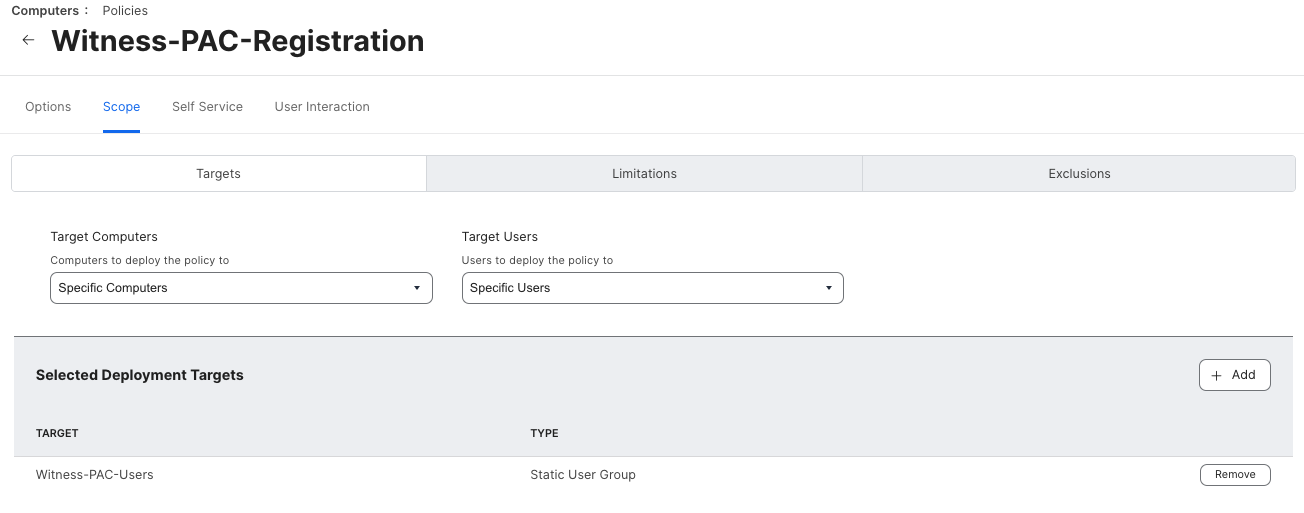
Jamf Pro ‘Witness-PAC-Registration’ policy Scope tab showing Target Computers set to ‘Superior Computers’, Target Users set to ‘Superior Users’, and Selected Deployment Targets listing ‘Witness-PAC-Users’ as a Static User Group. Used to restrict the policy to users in the Witness-PAC-Users group.
  • The registration script will now be pushed to the target macOS devices and will be run during next device login.
  • PAC URL Storage: After successful registration, the PAC URL will be stored in a plist file on the client machine located at:
    • /Library/Preferences/com.witnessai.settings.plist
  • The PAC URL is persisted in the plist file to ensure that it is available for further configurations.
  1. Upload Mobileconfig File to Jamf
    • Navigate to Computers > Configuration Profiles and Click on Upload
    • Now choose the mobileconfig file, downloaded in Step 1 from the UI and upload it.
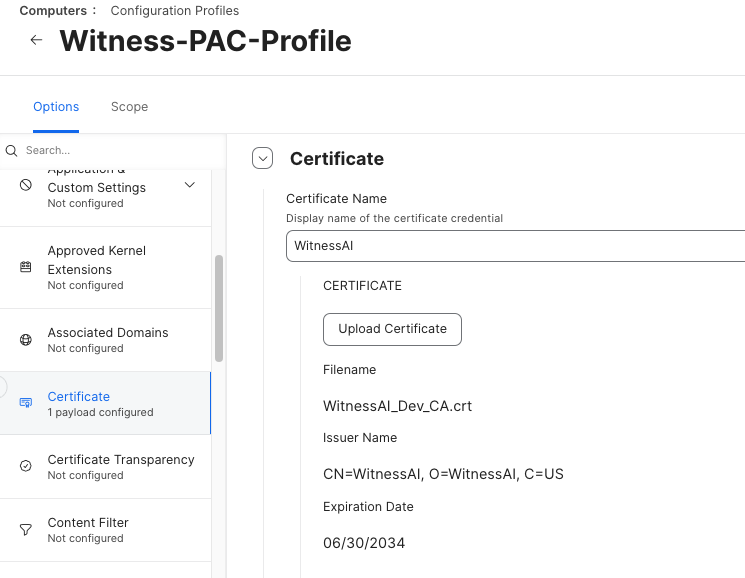
    • Go to Certificate Tab and Ensure that you see the Proxy CA Certificate details.
    • Jamf Pro ‘Witness-PAC-Profile’ Configuration Profile showing the Certificate section. Left sidebar shows Options selected with Certificate highlighted (1 payload configured). The Certificate shows Name ‘WitnessAI’, Filename ‘WitnessAI_Dev_CA.crt’, Issuer ‘CN=WitnessAI, O=WitnessAI, C=US’, Expiration 06/30/2034.
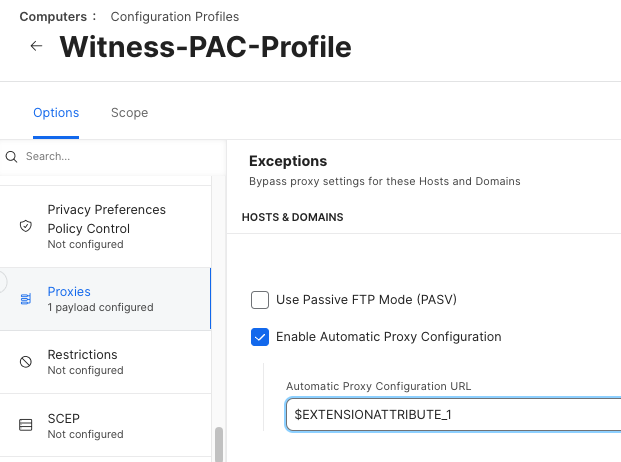
    • Select Proxies under Options and replace the Extension Attribute ID number with the ID number obtained in Step 2.
    • In this example the ID number obtained in Step-2 was 1 and hence the value for Automatic Proxy Configuration URL is set as $EXTENSIONATTRIBUTE_1
      Ex: If the ID value obtained in Step 2 is 16, the value here should be $EXTENSIONATTRIBUTE_16
      Jamf Pro ‘Witness-PAC-Profile’ Configuration Profile showing the Proxies section. Left sidebar shows ‘Proxies’ selected (1 payload configured). The right side shows ‘Enable Automatic Proxy Configuration’ checkbox is checked and the Automatic Proxy Configuration URL field contains ‘$EXTENSIONATTRIBUTE_1’ (referencing the Extension Attribute ID).
    • Now go to the Scope tab, then Click on Add and Select Witness-PAC-Devices under Computer Groups.
    • Now save the configuration.
  2. Verification
    • During the next user logon, the registration script will run on the device.
    • If the Username/Email is present in the Witness AI Console, the registration will be successful.
    • The logs for the registration script will be stored at /tmp/pac_registration.log on the device.
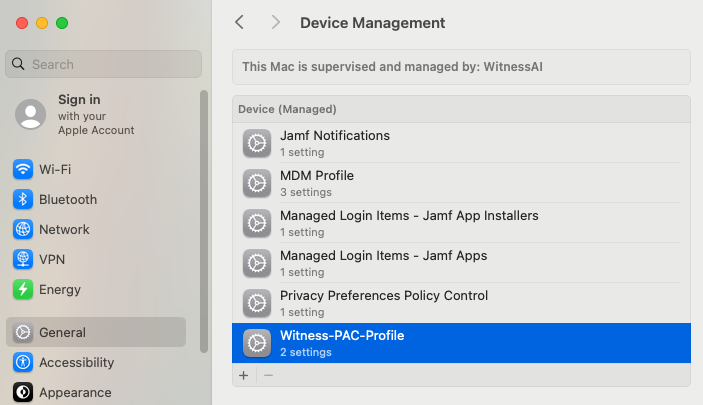
    • If the registration is successful, the PAC Profile should be visible under Settings > General > Device Management
    • macOS System Preferences > Device Management screen showing ‘Witness-PAC-Profile’ highlighted in the list of managed profiles. The device is supervised and managed by WitnessAI. Other profiles visible include Jamf Notifications, MDM Profile, Managed Login Items (Jamf App Installers), Managed Login Items (Jamf Apps), and Privacy Preferences Policy Control.
    • The device should now be PAC ready and AI traffic should be routed via WitnessAI Proxy.
Remove PAC Files - PAC Flush

PAC files can be removed from a User Device by following the below steps:
  1. Remove the User from the Static User Group used for pushing the registration script
  2. Navigate to Users > Static User Groups and open the Witness-PAC-Users group.
    Under the Assignments tab, Click on Edit and remove the User and save it.
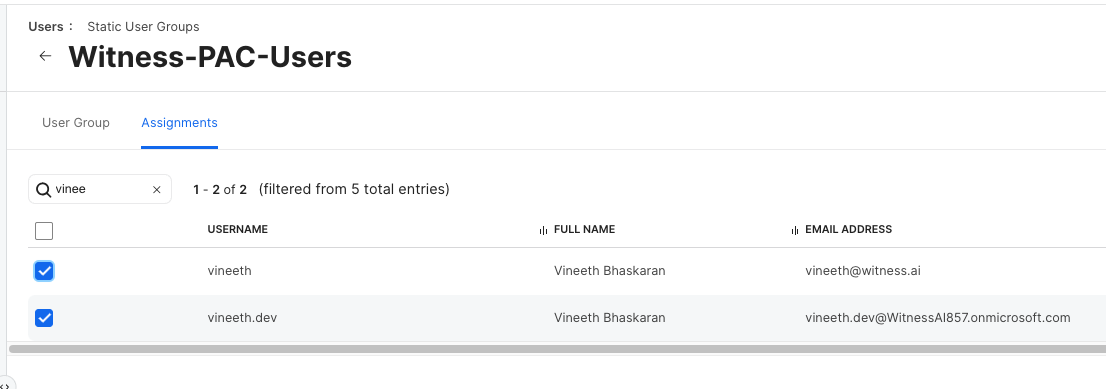
    Jamf Pro ‘Witness-PAC-Users’ Static User Group showing the Assignments tab with 2 users selected (both checkboxes checked): ‘vineeth’ (Vineeth Bhaskaran, vineeth@witnessai) and ‘vineeth.dev’ (Vineeth Bhaskaran, vineeth.dev@WitnessAI807.onmicrosoft.com). Filtered from 5 total entries.
  3. Create a new User Group under Users > Static User Groups.
  4. Give the Display name as Flush-PAC and add the offboarded user account under Assignments Tab.
  5. Navigate to Settings > Computer management > Scripts and Click on New
Enter the below details and save it:
Display Name: Witness-PAC-Flush
  • Paste the Flush script downloaded from the UI in Step-1 under the script tab.
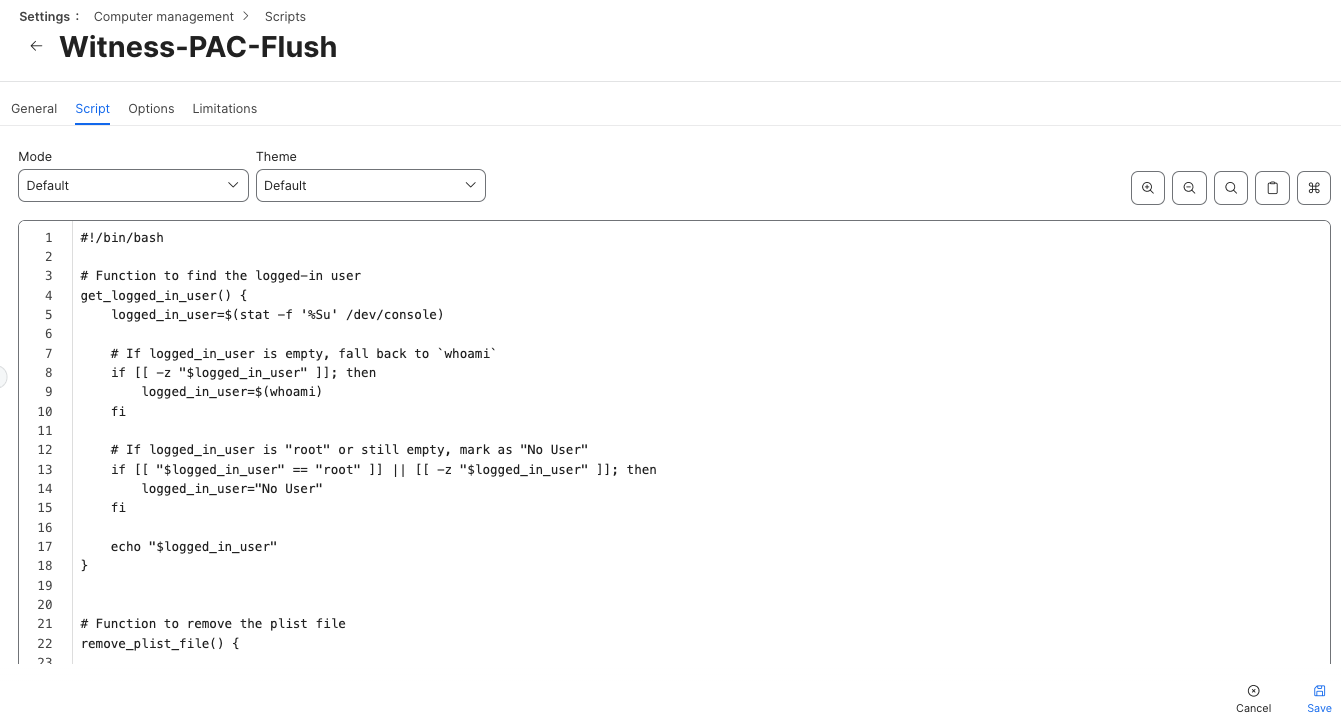
Jamf Pro ‘Witness-PAC-Flush’ Script configuration showing the Script tab with bash script content. The script includes functions to find the logged-in user (get_logged_in_user) and remove the plist file (remove_plist_file). Mode and Theme are set to Default.
  1. Navigate to Computers > Policies and click on New
  2. In General Section:
    • Give the Display Name as Witness-PAC-Flush
    • Trigger: Login
    • [Note: A login event that checks for policies must be configured in Jamf Pro for this to work]
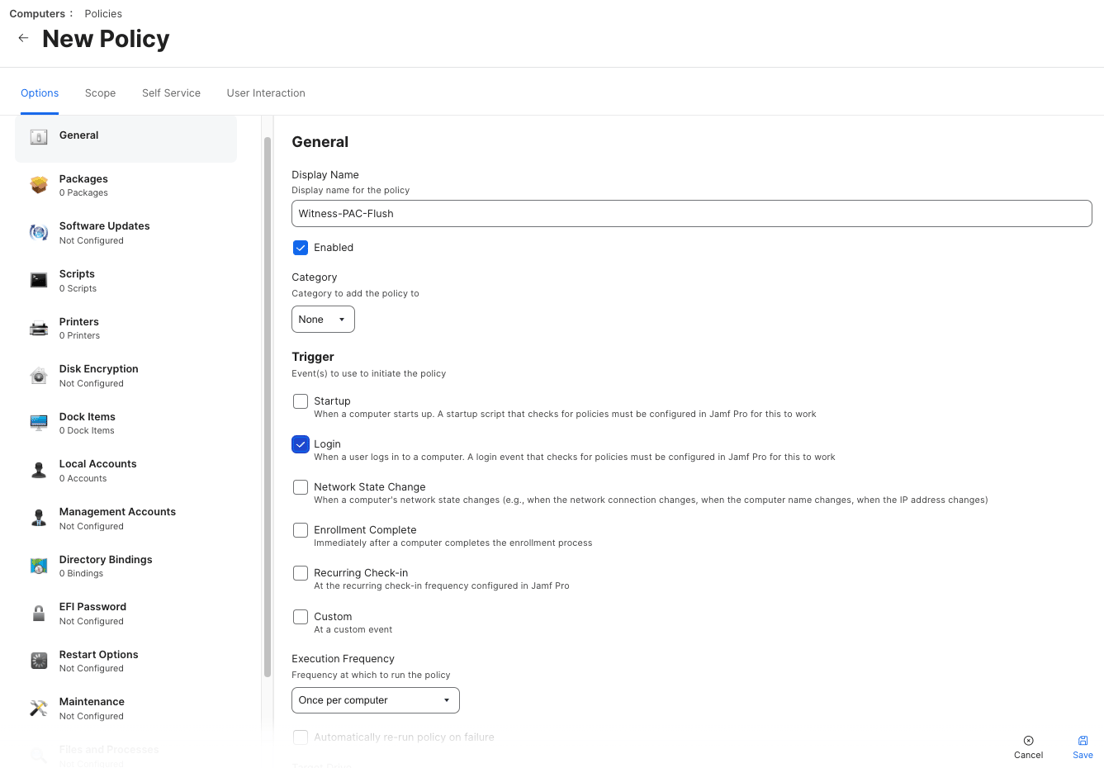
Jamf Pro ‘New Policy’ General section for the PAC Flush policy showing Display Name ‘Witness-PAC-Flush’, Enabled checkbox, Trigger with Login selected, and Execution Frequency configuration. This policy deploys the flush script to remove PAC configurations from macOS devices.
  • Click on Scripts Section Under Options and then Click on Configure.
  • Click on the Add button for Witness-PAC-Flush Script.
  • Now Click on the Scope Tab on the Top and click on Add
  • Select User Groups and Add the PAC-Flush group and click Save.
  1. The registration script will now be pushed to the target macOS devices and will be run during next device login.
  2. Once the script run is completed the Proxy PAC Profile will be removed from the device in 2 minutes.
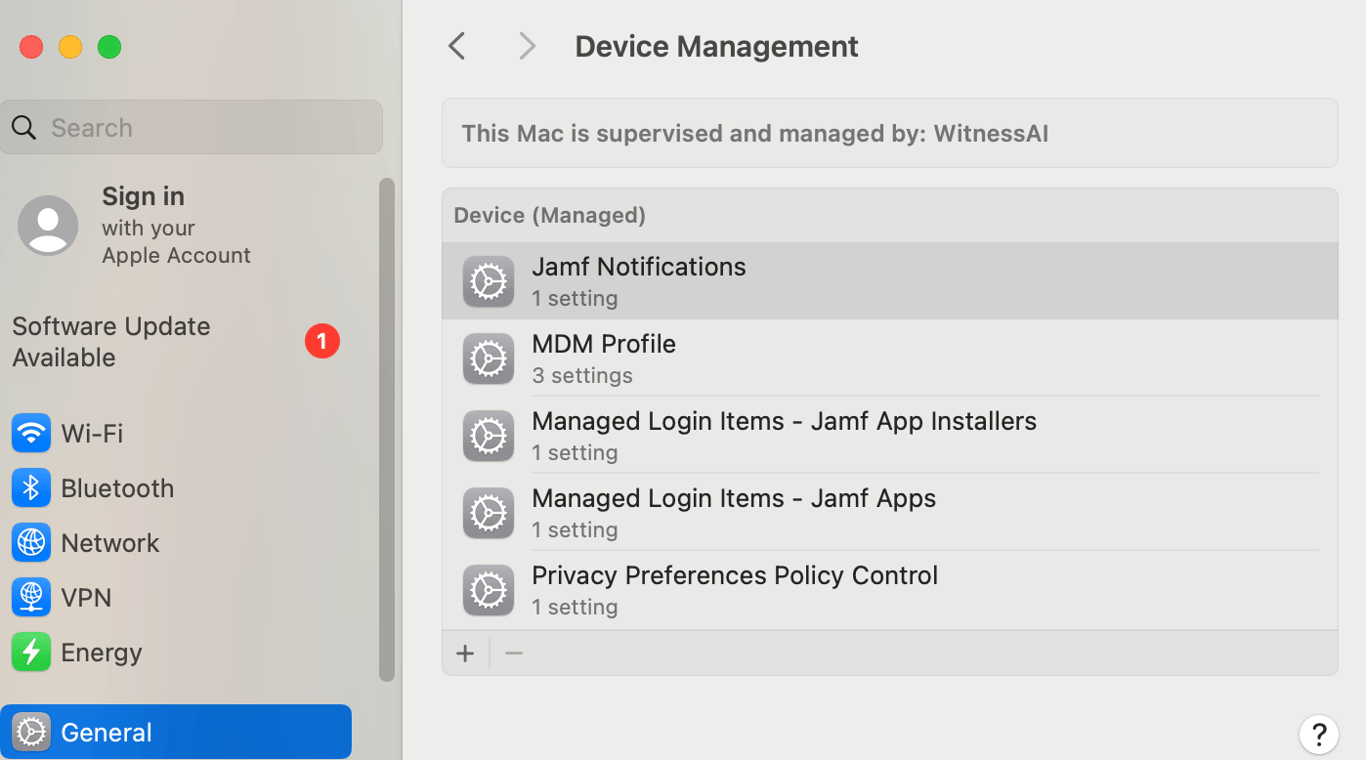
  3. macOS System Preferences Device Management screen after PAC flush, showing ‘Witness-PAC-Profile’ has been removed from the managed profiles list. Only remaining profiles are Jamf Notifications, MDM Profile, Managed Login Items (Jamf App Installers), Managed Login Items (Jamf Apps), and Privacy Preferences Policy Control. Confirms successful PAC flush.
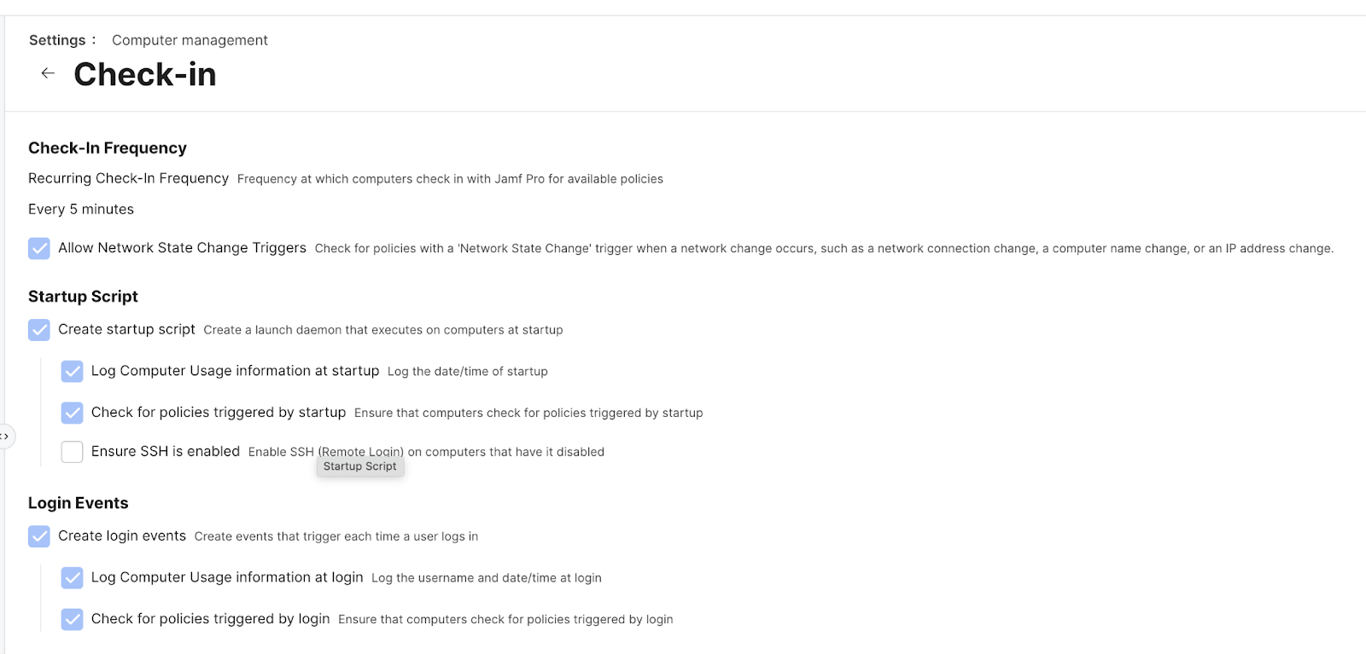
Jamf Pro Settings > Computer management > Check-in configuration page showing: Check-In Frequency (every 5 minutes), ‘Allow Network State Change Triggers’ option, Startup Script section with options to Create startup script, Log Computer Usage at startup, Check for policies triggered by startup, Ensure SSH is enabled. Login Events section shows Create login events, Log Computer Usage at login, Check for policies triggered by login.
  • Settings > Computer management > Check-in
  • Click on Edit and Check the below items:
  • Create login events
  • Check for policies triggered by login